


Results 11 to 20 of 21
|
|
-
Survivor of a Close Call

- Join Date
- Jul 2008
- Location
- Tegucigalpa, Honduras, Central America
- Posts
- 19
 07-26-2008, 08:33 PM
Thank you Carl, but it still plain sucks! I know of other brands (as Cagiva) that at some times (don`t know if they still keep doing this) have used Suzuki engines. The best example I can remember right now is the Cagiva Raptor, which uses a TL 1000 engine, and if I remember correctly, it even makes more power in the Raptor form. Still dissapointed if what you said got to be true. Well, at the end, the really important thing is the ride. If I had bought this bike for power and speed I would be more lost than a lice in a doll`s head. I have my Yamaha R6 for that.
07-26-2008, 08:33 PM
Thank you Carl, but it still plain sucks! I know of other brands (as Cagiva) that at some times (don`t know if they still keep doing this) have used Suzuki engines. The best example I can remember right now is the Cagiva Raptor, which uses a TL 1000 engine, and if I remember correctly, it even makes more power in the Raptor form. Still dissapointed if what you said got to be true. Well, at the end, the really important thing is the ride. If I had bought this bike for power and speed I would be more lost than a lice in a doll`s head. I have my Yamaha R6 for that. Originally Posted by CrazyCarl


-
C-Moto Regular
- Join Date
- Jun 2008
- Posts
- 63
07-27-2008, 06:30 AM
thank you guys for the specs. i am taking my xf200 into the dealer next week for 4,000 mile maintenance. i am a little late as i wanted to get there sooner as i am experiencing power/top end loss and some idling issues. i was worried it was either some crap stuck int he carb or clutch slippage as it stutters at top speed once in a while now.
but since reading this thread i am confident that the valves need adjusting since they are making more noise than usual. i am also going to add a fuel filter!!!
if the stuttering persists i will look in the carb. i was planning on going down a notch on the jetting anyways for fuel consumption as the 135 seems to be overkill!!!
i will be using the specs to judge the dealerships knowledge. up to this point they have been great. i am just curious what they will say.Simple XF200 Blog
http://xf200qlinksupermoto.blogspot.com
XF200 Blog RSS FEED
http://feeds2.feedburner.com/QlinkXf200Motorcycle
You Tube link
http://www.youtube.com/watch?v=g1_XLNLE4zw
-
Honorary C-Moto Guru
- Join Date
- Jun 2008
- Location
- Gijon, Asturias, Northern Spain
- Posts
- 580
07-27-2008, 05:10 PM
Great. Do let us know what they say.
If the valve clearance adjustment doesn't clear the idling problems, take a look at the ACV, also variously called "Coasting Enrichener", "Transient Enrichment Circuit" (Suzuki), or simply ACV (Air Cut-Off Valve).
This is a device on the left hand side of the carb, just behind the choke lever that looks like a lump held by 3 screws (extremely tight, had to use an impact driver).
On CV carbs that are very lean jetted to comply with emissions legislation there was a problem when you decelerate from high revs. The mixture becomes so weak that it caused "popping" on the exhaust. This is of no consequence, but it looks and sounds bad to the sophisticated and refined Jap bike customer...
The idle circuit comprises an idle gas jet and an idle air jet. This is fed from two air channels. One of them passes through the ACV and during normal running and idling remains open. On strong deceleration the high vacuum formed in the intake manifold operates a diaphragm against a spring inside the valve that closes off one of the air paths. This causes the idle mixture to enrich and stops the popping that the weak mixture would cause.
In practice this valve causes all sort of problems, (just Google using its various names), lots of people just eliminate it as one of the problems it causes is the difficulty in adjusting the idle and slow running mixture. The valve keeps meddling and changing the idle mixture on its own.
If the idle problem symptoms are that, normally, in your garage or street, the engine responds well to the throttle with no hesitation, and returns normally to idle after a burst of throttle, BUT on the road and after decelerating from a high gear and stopping, the engine just dies or it doesn't respond well to "blipping" the throttle in the usual manner to drop down a gear, but it responds instantly once stopped, this valve could be the trouble.
This is one of the best articles I've seen explaining how it works and methods of removing it when it doesn't:
http://www.thumperfaq.com/acv.htm
This is what's inside the valve, I know it doesn't look much, but you'll be surprised at how much it costs, $30 to $40...In my case I only found the trouble was a blocked airway caused by the carb ingesting a bit of the yellow foam from the air filter that had fallen off, but I'm considering eliminating it.

By the way, adding a fuel filter may be a good idea. I couldn't see one but assumed it was built-in the gas tap, but there isn't one there either.Last edited by forchetto; 08-03-2008 at 06:55 PM.
Jincheng Monkey JC50Q-7
Skyteam Dax replica ST110-6
Zongshen ZS125-43
Qingqi QM200GY-BA Super Motard
Qingqi QM110GY
-
Administrator-tron
- Join Date
- Apr 2008
- Location
- NoVA
- Posts
- 2,540
08-06-2008, 09:46 AM
Volks....
Is this the first time adjusting the valves?
CC
Originally Posted by volksjagger
---------------------------------------------------
Subscribe to the hippest, most happeneing Adventure Motorcycle Magazine around!
Adventure Motorcycle Dual Sport News Magazine
Help support MCM!! Buy "The Return - Riding Western China" DVD! -
http://www.motocyclops.com/buydvd/
Personal China travel info, photo and video site:
http://www.carlparker.com
-
Life Is Good!
- Join Date
- May 2008
- Location
- Guangdong, China
- Posts
- 1,509
08-11-2008, 04:56 AM
Decided to take the plunge and do the valve adjustment this weekend. I took some notes and pictures so people can see it's really not that difficult. I'm fairly sure all the Chinese motorcycles use a rocker arm design. The benefits of this are lower manufacturing costs and easy adjustments. The downside being more frequent adjustments and accelerated wear on the guides due to lateral friction.
The shim under bucket design that is found in most modern motorcycles requires less maintenance, but can be a real PITA because you need a set of shims and generally must remove the camshaft to perform the adjustments.
I worked in a Suzuki dealership in the late 80's and early 90's. At that time, almost all Suzuki models were using the rocker arm adjuster. We performed a first service at 600 miles and the valve adjustment was part of that service. I would say about half the bikes serviced were out of spec. Suzuki usually recommended 4000-8000 miles between valve adjustments. After the initial adjustment, most of the bikes we serviced stayed within spec and rarely required further tweeking until they reached high mileage.
I think it's safe to say that most people don't touch their valves for two reasons. #1 Shops charge an arm and a leg for it because it's very time consuming. #2 Noisy valves usually won't stop the bike from running, and most people ignore maintenance until they are stranded on the road.
With that said, I think it's best if you perform an initial valve adjustment at 1000 kilometers and then check them every 5000 kilometers.
So let's get started..... I always like to start with a clean bike before tearing her down and getting inside. You are going to have a few areas of your engine exposed during the process, any loose crud hanging around your engine could fall inside and really ruin your day. Also not a bad idea to use a work stand for this operation.
Ain't She Purdy!
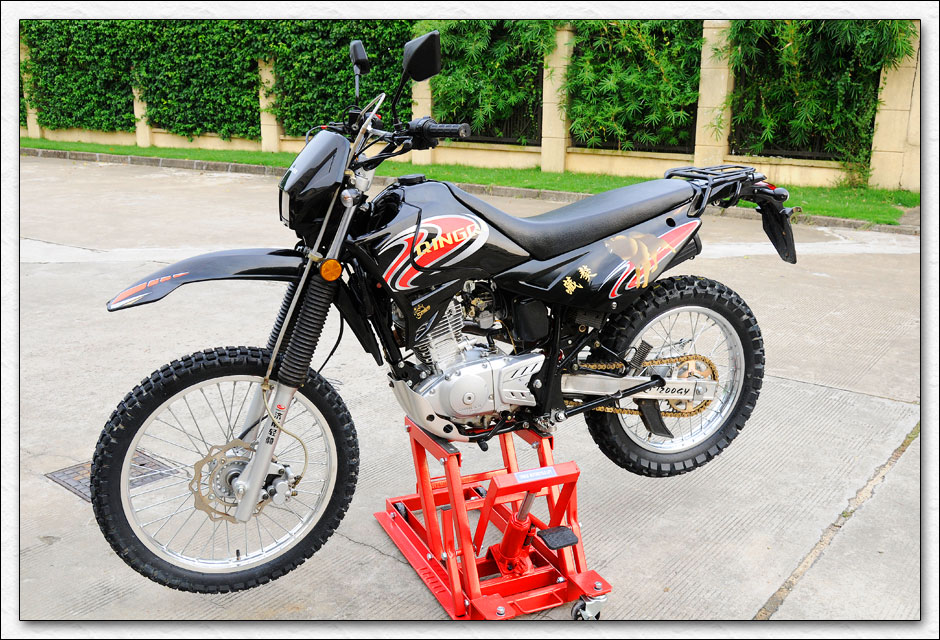
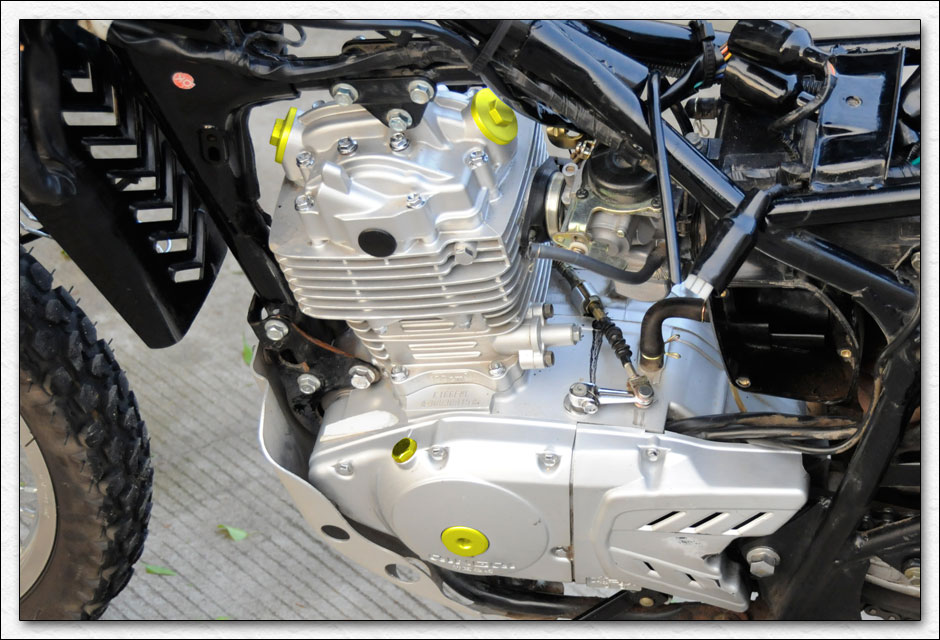
I would recommend pulling the seat, side panels and tank off. It's not absolutely necessary, but it makes the process a lot easier. Now that she's naked, remove the spark plug and the four items marked in yellow in the following picture.
#1 Front Valve Cover 17mm spanner
#2 Rear Valve Cover 17mm spanner
#3 Timing Mark Cover 17mm spanner
#4 Small Engine Cap 10mm Allen Wrench
Put your 17mm socket inside the hole, where the 10mm allan cap was, and rotate the engine around (counterclockwise) until you see a mark on the flywheel indicating Top Dead Center. Verify you are at Top Dead Center (TDC) by checking the position of the piston through the spark plug hole. If you got it right, you can grab one of the rockers and wiggle it a bit. Remember, this is a four stroke engine, the piston will be at TDC twice during the four strokes. This is what you should see through the inspection hole if you got it right.

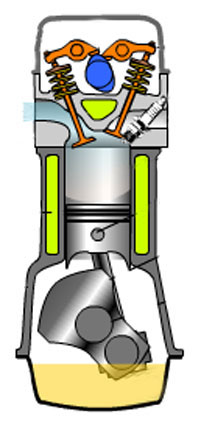
Now, let's have a look at one of the valves. This happens to be the intake valve, but it is identical to the exhaust valve.
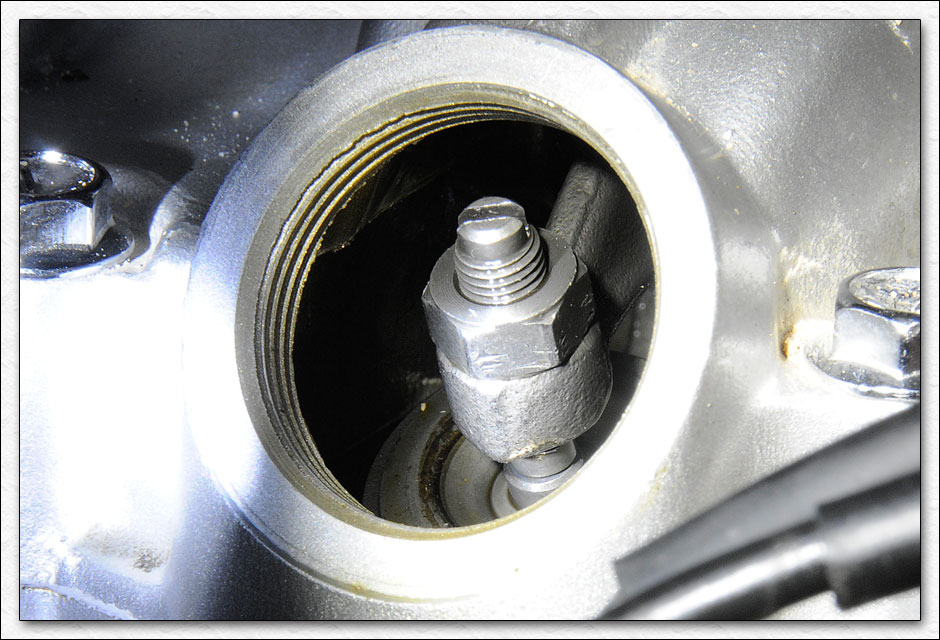
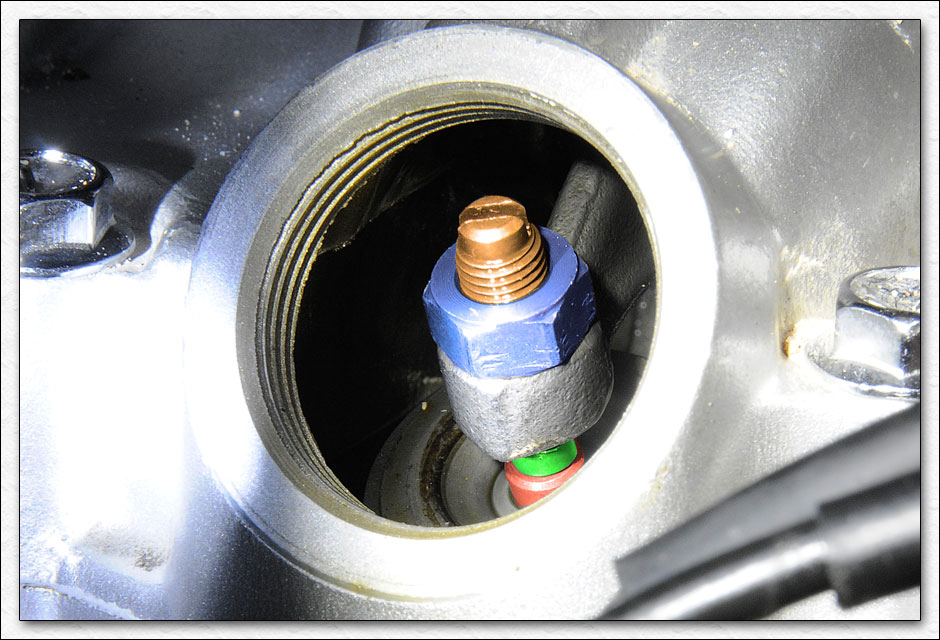
Here's some colour coding and explanations for you first timers.
The first thing you need to understand is what we are adjusting here. At the bottom, you will see a Green part and a Red part. We are trying to measure and set the gap (space) between these two items. The Orange screw at the top is what you will turn to make the adjustment. The Blue nut keeps everything tight after you have made the adjustment. Pretty simple
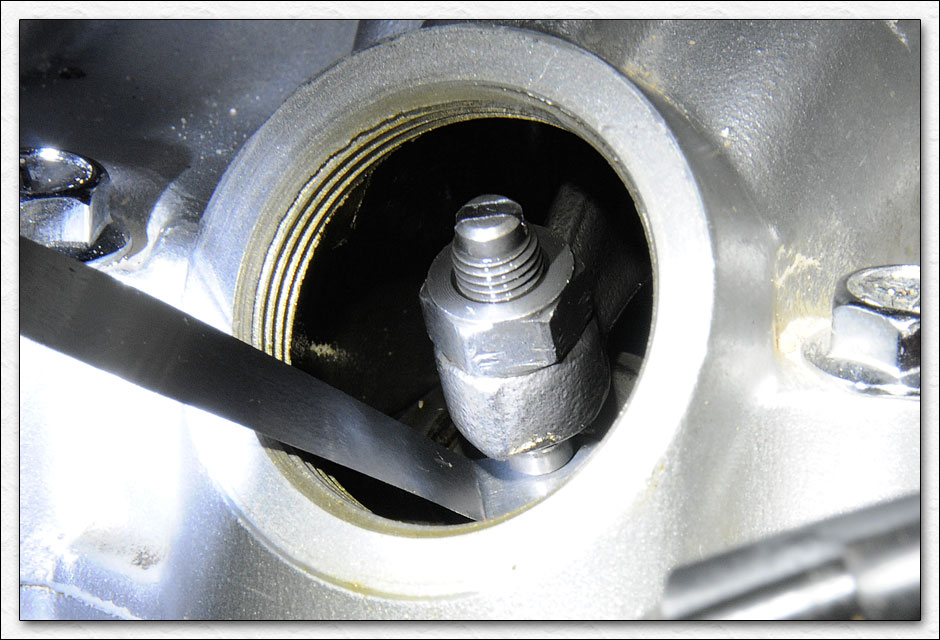
You will need a set of feeler gauges to measure the gap. First thing you want to do is check the current gap, maybe your valves don't need adjusting. Through CrazyCarl, we have learned that the correct specification is .06mm to .08mm for both the exhaust and intake ports. Take a .09mm gauge and slip it in. If it goes in, you're valves are too loose. Take a .06mm gauge and slip it in. If it doesn't go in, your valves are too tight.
If you need to adjust them, loosen the nut and back the adjuster screw out. Insert a .07mm gauge and carefully tighten the adjuster until it lightly pinches the gauge. You should be able to pull the gauge out. Now tighten the lock nut down without rotating the adjuster screw (not easy unless you have 3 hands). If you did it correctly, the .06mm will easly slip in, the 07mm will slip in with a little wiggling and the .08mm will not go. If you can't get a .06mm in there, they are too tight. If you can get a .09mm in, they are too loose.
Now that you have both the intake and the exhaust valves adjusted, step back and drink a beer It's a good idea to verify your work, so rotate the engine a few times and then check them again. Be patient, you probably won't get it right the first time, I didn't
 If everything appears to be in good working order, put the bike back together and fire it up. With any luck she will be smooth as silk. If you hear some nasty clacking sounds, immediately shut the bike off and check the valves again.
I took a quick run around the block and the bike definately responds better and the engine sounde nice and smooth. I will need to take her out for a good thrashing and see if this helps with the stalling issue I have been encountering all along.
Cheers!
ChinaV
-
C-Moto Guru
- Join Date
- Apr 2008
- Location
- Red China
- Posts
- 405
08-11-2008, 05:29 AM
Verry informative post sir, thank you very much. I really like all the fancy colours
-
Honorary C-Moto Guru
- Join Date
- Jun 2008
- Location
- Gijon, Asturias, Northern Spain
- Posts
- 580
08-11-2008, 07:37 PM
Brillant post...words fail me! I think it ought to be a sticky. The quality of the photos is something else. Thank you.
Jincheng Monkey JC50Q-7
Skyteam Dax replica ST110-6
Zongshen ZS125-43
Qingqi QM200GY-BA Super Motard
Qingqi QM110GY
-
Administrator-tron
- Join Date
- Apr 2008
- Location
- NoVA
- Posts
- 2,540
08-12-2008, 12:25 AM
That's a good idea! Originally Posted by forchetto
CC---------------------------------------------------
Subscribe to the hippest, most happeneing Adventure Motorcycle Magazine around!
Adventure Motorcycle Dual Sport News Magazine
Help support MCM!! Buy "The Return - Riding Western China" DVD! -
http://www.motocyclops.com/buydvd/
Personal China travel info, photo and video site:
http://www.carlparker.com
-
Life Is Good!
- Join Date
- May 2008
- Location
- Guangdong, China
- Posts
- 1,509
08-12-2008, 05:31 AM
Thanks for the kind words guys. It's nice to see that people appreciate the time that was put in. I get a lot of great info from this site, so it's the least I can do to give a little back. Getting a sticky
 .... sweet!
Upcoming events will include:
Stator replacement
Clutch fix
Maybe change the front forks to the USD ones
Looking forward to working with you guys on those as well.
Cheers!
ChinaV
-
C-Moto Regular
- Join Date
- Jun 2008
- Posts
- 63
08-13-2008, 06:52 PM
went and got the tune up. they were not interested in comparing notes and seemed to just want to to do the valve adjustments. they determined it needed to be done.
anyway my stuttering problem is gone. it still idles just a tad off. but i went gigantic on the jet and will be re-jetting soon.
i went from a stock 122.5 to a 135. it hurt my fuel economy pretty severely. about 40 miles less a tank. on top of that my plug was too black. i am getting some light popping. so i am going to go down to a 127.5 jet.
i wanted to see if the valve adjustment would resolve everything first.
now jp is offering a rear sprocket too!!! o man, down 3 teeth brings 4th gear alive. i almost forget i am in 4th in certain situations. and now at 75 miles per hour i am at an even 7000 rpms!!! bonus!!!
i think if i fix my jetting i will be all set.Simple XF200 Blog
http://xf200qlinksupermoto.blogspot.com
XF200 Blog RSS FEED
http://feeds2.feedburner.com/QlinkXf200Motorcycle
You Tube link
http://www.youtube.com/watch?v=g1_XLNLE4zw


| « Previous Thread | Next Thread » |
| Bookmarks |
Bookmarks |


A Working VPN Solution?
04-11-2024, 03:10 AM in Off Topic Discussions